
Salon lash extensions in the UK run £80-£150, take 2 hours, and need infills every 2-3 weeks. Cluster lashes are the smarter cousin. You get the same "just had them done" look, they last 7 days, they take 5 minutes to apply, and a kit costs under £20. Once you know the technique, most people never go back to strip lashes or salon extensions.
This guide walks you through exactly how to apply cluster lashes at home properly — from choosing the right style for your eye shape, through application, all the way to making them last the full 7 days. Everything I wish someone had told me the first time I tried them.
What are cluster lashes?
Cluster lashes are small groups of 5-10 lashes bonded at the base, designed to be applied directly to your natural lash line. Think of them as the middle ground between strip lashes (one big band) and individual lash extensions (one lash at a time).
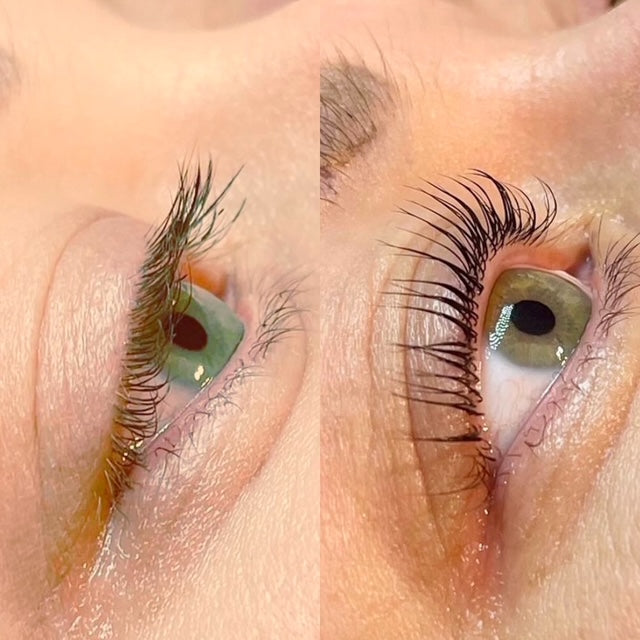
Each cluster is placed along your lash line with a bond adhesive, filling in gaps and adding length or volume where you want it. The finished look is more natural than strips (no visible band across your lid) and dramatically faster than extensions (5 minutes vs 2 hours).
Our 7 Day Cluster Lashes DIY Kit contains 40 clusters in mixed lengths (8mm, 10mm, 12mm, 14mm) so you can customise the look. Small clusters go on the inner corners for a subtle lift, longer clusters go on the outer corners for that "cat eye" flare.
Cluster lashes vs strip lashes vs extensions: what's the difference?
The three most confused products in the lash world. Here's the actual difference:
Strip lashes
One continuous band of lashes glued along your lash line. Cheap, easy, but obvious — the band is visible up close, and they only last one wear. Best for a one-off event where you're happy to remove them at the end of the night.
Cluster lashes
Small groups of lashes applied in sections along the lash line. Look far more natural than strips (no band), last up to 7 days with proper bond, and are reusable up to 3 times if you remove them carefully. This is what we make.
Individual lash extensions
Applied one lash at a time by a technician, glued to your natural lash. Longest-lasting (4-6 weeks with infills) but expensive, time-consuming, and can damage natural lashes over time.
If you want lashes that look salon-fresh for a week without the salon commitment, cluster lashes are almost always the right answer.
Why do cluster lashes at home?
Three reasons, in order of importance for most people.
Cost. A single salon visit for cluster lashes in the UK is £40-£60 per session. Our 7 Day Cluster Lashes Kit is £19.95 for 40 clusters — enough for at least 4 full applications. That's under £5 per lash set vs £40+ at the salon.
Speed. Salon appointments need booking, travel, sitting still for an hour. At home, once you know what you're doing, it's 5 minutes at the mirror. Do it before dinner, keep them for a week.
Freedom to switch it up. Want a subtle look for work and dramatic lashes for the weekend? At home you can change your style whenever. We do three styles — Softly Sleek (natural), Whispy Winks (fluttery), and Bold Blink (dramatic) — swap between them as your mood changes.
What you'll need
Everything is in the kit, but here's the checklist so you can prep:
From the 7 Day Cluster Lashes Kit:
- 40 mixed-length clusters
- Application tweezers (or use our DIY Pro Lash Applicator for beginners)
You'll also need (available separately if not already bought):
- Bond & Sealer (our 2in1 Bond & Sealer holds for 7 days)
- Micellar water or oil-free cleanser for pre-application
- A well-lit mirror
- Cotton pads
And later, when you want to remove:
- Our DIY Pro Lash Remover (specifically formulated for cluster lashes — normal makeup remover won't touch the bond)
Do a patch test with the bond on the inside of your wrist 24 hours before your first application. Reactions are rare but not worth risking.
Step-by-step: how to apply cluster lashes at home
Total time: 5-10 minutes once you have the hang of it. First few tries might take 15 minutes — that's completely normal.
Step 1: Cleanse and dry
Remove all eye makeup and any oil residue with micellar water on a cotton pad. Oil breaks down the bond, so this step matters. Pat completely dry — even damp lashes will weaken the hold.
Step 2: Plan your look
Sort your clusters by length. In general:
- 8mm clusters go on the inner third of your lash line
- 10mm clusters go on the middle third
- 12mm clusters go on the outer third
- 14mm clusters (Bold Blink kit only) go on the outermost corners for maximum flare
For a natural look (Softly Sleek), stick mostly to 8mm and 10mm.
For dramatic (Bold Blink), lean into 12mm and 14mm on the outer half.
For wispy (Whispy Winks), alternate lengths across the lash line for that feathered effect.
Step 3: Apply the bond
Squeeze a small line of bond onto the back of your (clean, non-dominant) hand. Not directly on your lash — this gives you a working reservoir.
Using the applicator tool or clean tweezers, pick up a cluster by its base. Dip just the base band (not the lashes themselves) into the bond. You want a tiny amount — a rice-grain size, not a blob.
Step 4: Place the cluster
Look down into your mirror. Position the cluster on top of your natural lashes, as close to the root as possible without touching your skin. Press gently and hold for 3-5 seconds — this is what activates the bond.
Work outward from the inner corner. Leave a tiny gap between clusters (they shouldn't overlap — that's what makes them look chunky).
Common beginner mistake: applying too far out on the natural lash. The cluster should sit near the root, not halfway down the lash. Getting the placement right is 80% of a good result.
Step 5: Fill in the gaps
Once you've done the main lash line, look at the mirror and identify any obvious gaps. Add smaller (8mm) clusters between the bigger ones to blend everything together.
Step 6: Seal (this is the 7-day secret)
Once all clusters are in place and the bond has set for 2-3 minutes, apply a thin layer of the sealer over the top of each cluster where it meets your natural lash. This is what turns a 3-day lash into a 7-day lash. Skip this step and expect them to start lifting by day 4.
Step 7: Fluff and inspect
Once dry, use a clean spoolie to gently brush your lashes into place, blending clusters and natural lashes together. Check the mirror from a few angles — the point where clusters meet natural lashes should be invisible.
You're done. If it took longer than you thought, you're normal — you'll be 5 minutes end-to-end by the third application.
How to make cluster lashes last the full 7 days
Three things separate a 3-day lash from a 7-day lash:
Sealer, always. Never skip step 6. The seal is what turns adhesive into something water-resistant enough to last a week.
Sleep smart. Sleep on your back if you can. Side-sleepers, invest in a silk pillowcase — cotton drags on the lashes and shortens their life by 2-3 days.
Oil-free everything near the eyes. Cleansers, moisturisers, sunscreen, eye creams — check every product going near your face for oils. Even a tiny amount of coconut oil migrating up your face at night will loosen the bond.
Water is fine — you can shower normally. Just don't scrub the lash line, and pat (don't rub) dry.
Common mistakes to avoid
Six years of customer feedback, three biggest mistakes:
1. Too much bond. If you can see the adhesive on the cluster, you've used too much. It'll dry white and look obvious. Rice-grain size — not more.
2. Clusters too far apart or too close. Too far apart looks sparse and fake. Too close/overlapping looks chunky and heavy. Aim for a natural line — the clusters should sit next to each other, not on top of each other.
3. Applying to your eyelid, not your lash. This is the biggest one. Clusters go on your natural lashes at the root, not on your skin. If they're sitting on your lid, they'll pull, feel heavy, and won't last a day. Look DOWN into a mirror to see your lash line properly.
FAQs
Are cluster lashes safe for my natural lashes?
Applied correctly and removed correctly, yes. The bond attaches to your natural lash but the sealer means the cluster comes off when the natural lash naturally sheds — no pulling required. Damage almost always comes from pulling clusters off manually instead of using a proper remover.
How do I remove cluster lashes?
Use our DIY Pro Lash Remover on a cotton pad, hold it against your closed eye for 30 seconds to soften the bond, then gently slide the clusters off. Never pull them off dry — that's how you damage natural lashes.
Can I wear mascara with cluster lashes?
You don't need to, and it's not recommended. The clusters already look mascara-dark. If you must, water-based only, and only on the tips (not the base where the bond is).
Can I get cluster lashes wet?
After 2 hours from application, yes — shower, swim, cry at movies, all fine. Just avoid direct rubbing at the lash line and use oil-free products.
How long do a set of cluster lashes actually last?
With proper bond, sealer, and aftercare: 7 days. Without sealer: 3-4 days. With oil-based products getting near them: 2-3 days.
Can I reuse the clusters?
Yes — each cluster is reusable up to 3 times. Once removed, clean gently with micellar water on a cotton bud to remove any leftover bond, then store them back in the tray. A £19.95 kit gives you effectively 12+ wears if you re-use.
What if I mess up applying one?
Just remove that cluster with a bit of remover on a cotton bud, wait for the area to dry, and reapply. Don't try to force-place a badly-positioned cluster — take it off and start again.
Which style should I choose for my eye shape?
- Round eyes: Whispy Winks — the feathered look elongates
- Almond eyes: any of the three, most flexibility
- Hooded eyes: Softly Sleek or Bold Blink — the shorter inner + longer outer creates lift
- Small eyes: Softly Sleek or 8mm-heavy application — dramatic clusters can overwhelm
Ready to try your first at-home cluster lash application?
Everything you need is in the 7 Day Cluster Lashes DIY Kit — 40 clusters in four lengths, mixed for versatility, £19.95 with free UK delivery over £50. Pair it with our DIY Pro Lash 2in1 Bond & Sealer for the full 7-day wear, and pick up the DIY Pro Lash Applicator if you're new to the technique (game-changer for beginners).
If you know exactly the style you want, our DIY Pro Lashes come in three finished styles — Softly Sleek (natural), Whispy Winks (fluttery), and Bold Blink (dramatic). Grab whichever matches the look you wear most days.
Any questions on which style, technique or product suits you? Send us a message — we've been doing this a while and we'd rather chat through what would work for your lashes than sell you the wrong kit.